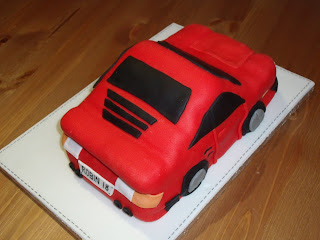
I also completed the long awaited car cake today! I have to say this is the most difficult cake I have ever attempted. It took quite a while to complete and with a lot of cake crumbs everywhere from the carving and jam to stick it together it finally started to resemble a car. Unfortunately it is not as much like a Porsche as I was hoping for but I am proud of it anyway.
Tuesday 15 February 2011
Sunday 13 February 2011
R2-D2
For my boyfriend's 25th birthday I said I would make him an R2-D2 cake. (eeek!) For those of you who may not have seen Star Wars (although I'm sure everyone has) this is R2:
I drew out all of the design as I thought it would be easier to cut out the cakes and all of the detail in the icing.
So I baked one circle cake and three rectangle cakes. (Believe me, that was a lot of eggs!!)
I cut the circle in half for the head and sandwiched them together with strawberry jam. I used two of the rectangles on top of each other for the body and cut the legs from the third rectangle.
I rolled out white sugar paste and covered the body/head first and the legs individually. This took quite a lot of paste as I wanted it to be thick and not crack as I moulded it.
I then used sugar paste to create all of R2's detail.... at this point I have to admit I got a little tired and didn't put as much detail on him as I wanted to. I would have liked to have done more work on the legs and possibly some on the body. However, regardless of that I think he turned out well...
After looking at about a thousand pictures of R2-D2 and other peoples R2 cake creations I set about making a plan...
So I baked one circle cake and three rectangle cakes. (Believe me, that was a lot of eggs!!)
I cut the circle in half for the head and sandwiched them together with strawberry jam. I used two of the rectangles on top of each other for the body and cut the legs from the third rectangle.
I rolled out white sugar paste and covered the body/head first and the legs individually. This took quite a lot of paste as I wanted it to be thick and not crack as I moulded it.
I then used sugar paste to create all of R2's detail.... at this point I have to admit I got a little tired and didn't put as much detail on him as I wanted to. I would have liked to have done more work on the legs and possibly some on the body. However, regardless of that I think he turned out well...
Tuesday 8 February 2011
Inspirational!
NeviePieCakes aka Natasha Collins can be found on her blog, website, Twitter, Facebook and Flickr!
I was just browsing the internet one day when I came across her beautiful creations on Flickr. Having come from a textile background also I appreciate the skills she has adapted and brought into her cake decorating. Her hand painted pieces are incredible, so delicate and pretty yet delicious looking! Go and have a look at some of her work and let her know what you think...
SmallThingsIced is Nicola, a self taught cake decorator based in Hampshire.
Again I found her through Flickr but she also has a website and blog. The first image that attracted me to her work is that of a birdhouse cake she has created:
It is so delicate and cute! I love it! Here are some more examples of her work:
Finally the last person I would like to share with you today:
Fair Cakes are a company that make cakes and cupcakes but also run classes in a number of places in the U.K.Unfortunately I can't show you any of their work but go and have a look for yourself, I'm sure you won't be disappointed!
Hope you like all of the creations on show here, I will let you know when I discover some more!
An old lady in a chair (part two)
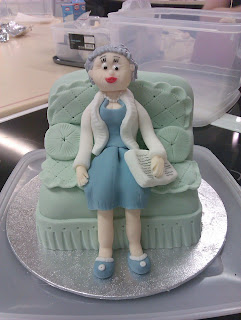
This week in cake decorating class I carried on with the lady in a chair project. We moved on to making the figure this week, which ended up being quite time consuming and difficult. (It also didn't help having a practice fire drill which cut our time in class short)
We started with the slippers, these are just balls of sugar paste, made into cones, flattened at the back and decorated with a pom pom and fur! We made the legs by rolling the paste into a sausage sort of shape that has a slightly thicker end at one end. Then knees and ankles are made by pinching the paste to give it shape. Cut a wedge from the bottom back of the leg for the foot. Then you can stick your legs to the slippers and chair with a little water:
The white square on the base of the board is the beginning of a newspaper.
I also added the body part of the cardigan, again this proved to be quite difficult as you need to measure it against the body and add the trim detail.
So for now Hilda will remain headless and arm-less until the next class...
We started with the slippers, these are just balls of sugar paste, made into cones, flattened at the back and decorated with a pom pom and fur! We made the legs by rolling the paste into a sausage sort of shape that has a slightly thicker end at one end. Then knees and ankles are made by pinching the paste to give it shape. Cut a wedge from the bottom back of the leg for the foot. Then you can stick your legs to the slippers and chair with a little water:
Next we made the skirt part of the dress. This is essentially just a rectangle of sugar paste that is gathered at the top and either marked with a knife or tool to give a pattern or if you have one you can use a patterned rolling pin so you have a nice flowery dress.
Next you need to make the body. I found this quite difficult, firstly she was fat with no waist, then she had droopy boobs, then squashed boobs! After a much needed re-modelling I got the body right. I then made the top half of the dress and wrapped it around the body with the join at the back which you won't see when she is sat in the chair. I also added a skewer that goes through the body and into the cake.
I also added the body part of the cardigan, again this proved to be quite difficult as you need to measure it against the body and add the trim detail.
So for now Hilda will remain headless and arm-less until the next class...
Thursday 3 February 2011
An old lady in a chair (part one)
In my cake decorating class at the moment we are working on a cake over a few lessons. It is going to be an old lady sitting in an armchair.
As we are working on it over a number of lessons we chose to bake a fruit cake as this is still edible after a while whereas sponge cakes should be eaten on the day they are baked if possible.
I started with a 5 inch square and 2 1/2 inch deep cake.
I cut it down and pieced it together to achieve the armchair shape.
I covered it in marzipan and then the fondant icing....
I used a number of tools to achieve the decoration on the chair, the star tip tool, crimpers, stitch wheel etc.
On Monday we will be creating the lady to sit in the chair.... she is going to have a blue dress, a white cardigan and slippers. I think if I can do it she will be knitting as well!! But you'll have to wait and see...
Subscribe to:
Posts (Atom)


